One of the cool things I stumbled upon last year at the Dutch PHP Conference was Vagrant. After some little experimenting I was convinced: this is the right tool for our development environment!
Since we’re running CentOS at the web agency I work for, I soon started searching for a nice base box to build upon. Not satisfied by the boxes available, I decided to create a base box myself.
Today we decided to switch to CentOS 6 for all our new boxes, so I had to build a new image for our developers to build on with Puppet and Vagrant. Since I had this free hosting account from Combell sponsored at PHP Benelux Conference I thought it would be nice to give something back to “the community” by writing my first blog post :).
This tutorial assumes you have installed Virtual Box. First of all, we start with downloading an ISO image so we can install a fresh instance of CentOS. Pick a mirror nearby and download the right image. We’ll be using the netinstall ISO since we want to keep the size of the image as small as possible.
I hear you thinking: why doesn’t he use the minimal ISO if size matters? Believe me, the minimal is *really* minimal. Too minimal is you ask me!
While the ISO is downloading, let’s fire up Virtual Box and create a new virtual machine. Choose the name you want and set OS to “Linux” and version to “Red Hat”. Also create a virtual disk with the desired space and pick “Dynamically allocated”.
Once you’re done with creating the VM, don’t forget to disable audio and USB. Also make sure you set the base memory to something like 700 MB. Otherwise the GUI installer won’t work, and you get the text installer which is limited!
Installation
Next thing is to fire up the VM, and Virtual Box’s “First Run Wizard” will pop up. Pick the ISO you just downloaded and click “Start”. After it’s booted, choose the option for installation and hit “return”. If all went fine, the installer will pop up. A few things to keep in mind here:
- disable ipv6
- select HTTP installation method and enter a mirror nearby; for using the Dutch Leaseweb mirror like I did you enter “http://mirror.nl.leaseweb.net/centos/6.2/os/i386/” (just replace the hostname with your preferred mirror’s hostname)
After the kernel is downloaded, you’ll see the GUI installer.
Follow the wizard and select partition layout (I use the default settings).
A few important things:
- Set vagrant as the root password
- Set vagrant-centos62 as hostname (Vagrant conventions)
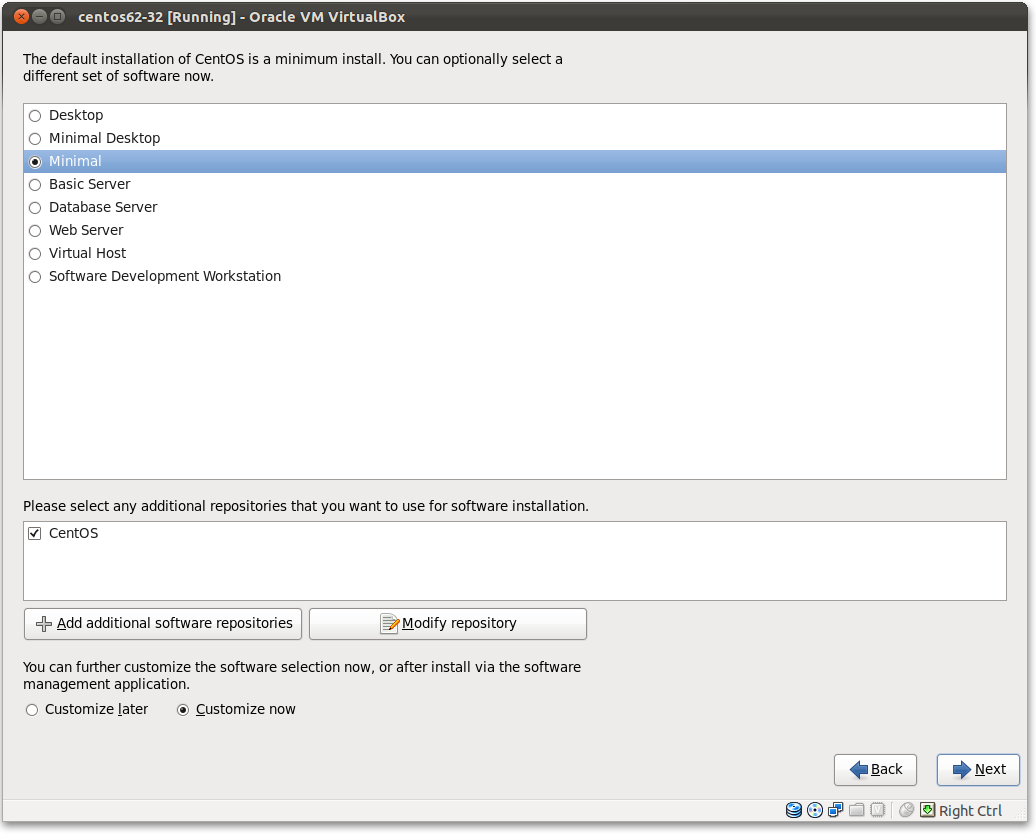
- In the software selection window make sure you choose minimal as the set, and also choose “Customize now” at the software selection:
In the next window unselect all packages (only one is selected if I remember correctly). After that you’re done, and the wizard will start downloading and installing the box.
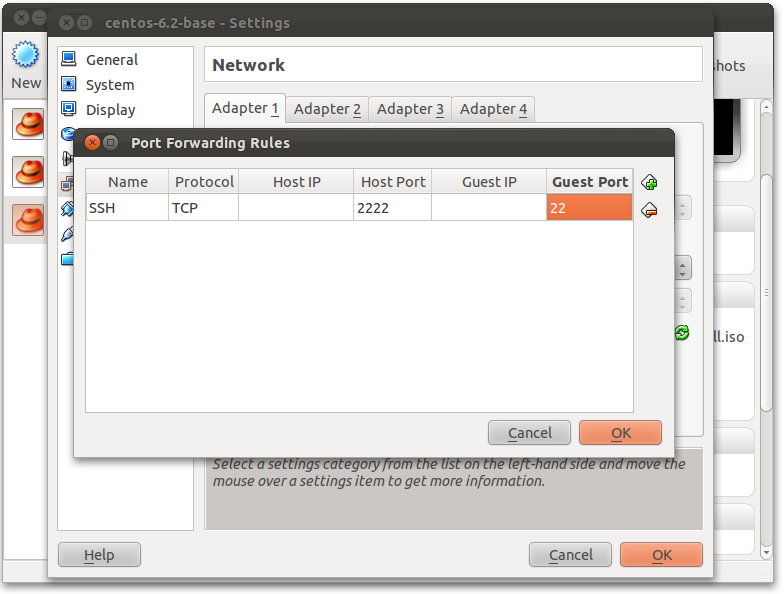
Once it’s done you’ll be prompted to reboot. Before rebooting, make sure you remove the netinstall ISO as CD attachment (in the “storage” settings). Also, to make things more easy during the configuration of our box forward the SSH port like this (select “Network,” “Adapter 1,” and then “advanced settings” and select “port forwarding”):

Now boot the VM (don’t forget to enjoy the new animated boot screen ;)).
Configuration for Vagrant
Once booted, connect to your VM via SSH:
|
1 |
ssh root@localhost -p 2222 |
Since there’s barely anything on the machine right now, I start with installing my favorite editor and some other stuff we’ll need:
|
1 |
yum install nano wget gcc bzip2 make kernel-devel-`uname -r` |
Next we are going to install the VirtualBox Guest Additions. Click on your VirtualBox window and select “Devices” and “Install Guest Additions”. The option is in the VM window, and not in the VirtualBox control panel. Install them like this (ignore the erros you get, this is because we aren’t running any fancy GUI):
|
1 2 3 |
mkdir /media/cdrom mount /dev/cdrom /media/cdrom sh /media/cdrom/VBoxLinuxAdditions.run |
Because we’ll be provosioning the VM with Puppet, we start with downloading the EPEL RPM package:
|
1 |
wget http://download.fedoraproject.org/pub/epel/6/i386/epel-release-6-5.noarch.rpm |
Add it:
|
1 |
rpm -ivh epel-release-6-5.noarch.rpm |
Verify with:
|
1 |
yum repolist |
Then install Puppet:
|
1 |
yum install puppet |
I personally prefer installing Puppet with yum, but you could also install it via gems or any of the other methods on the official installation guide. Installing with yum auto resolves dependencies, and with CentOS 6 we don’t have an ancient Ruby version anymore ;).
In order to keep things speedy, add the following line to the /etc/ssh/sshd_config file (it will disable DNS lookups):
|
1 |
UseDNS No |
Add vagrant user and set permissions
We’re almost there. Only thing left to do is add the vagrant user so Vagrant can log in and build our box.
Start with creating the user and adding it to the “admin” group (set the password to vagrant as stated on the Vagrant base box documentation):
|
1 2 |
groupadd admin useradd -G admin vagrant |
Now we only have to make some changes to the sudoers file. Do this with visudo (or manually edit /etc/sudoers, discouraged):
|
1 |
visudo |
There are a couple of things that need to be changed:
- Add
SSH_AUTH_SOCKto theenv_keepoption - Find the line with
Defaults requirettyand disable it by placing a # in front - Add the line
%admin ALL=NOPASSWD: ALLso that the vagrant user can sudo without password
Last but not least we’re going to add the public key so Vagrant can easily SSH into our box. Login with the vagrant user:
|
1 2 3 4 5 |
ssh vagrant@localhost -p 2222 mkdir .ssh curl -k https://raw.github.com/mitchellh/vagrant/master/keys/vagrant.pub > authorized_keys chmod 0755 .ssh chmod 0644 .ssh/authorized_keys |
Please note that I’m using the public insecure pair as described on the readme. If you’re not planning to share the box you probably want to use the config.ssh.private_key_path option in your Vagrantfile.
Package the box
Now first let’s clean up:
|
1 |
yum clean all |
Shutdown the box and package it. Replace centos62-32 with the name of your VM:
|
1 |
vagrant package --base centos62-32 |
Optionally you can also add a Vagrantfile into your base box.

